Read Values From Input Fields Javascript Ipcrenderer
Electron - Quick Guide
Electron - Overview
Why Electron?
Electron enables you to create desktop applications with pure JavaScript by providing a runtime with rich native (operating system) APIs.
This does not mean Electron is a JavaScript binding to graphical user interface (GUI) libraries. Instead, Electron uses web pages every bit its GUI, so you can besides see it as a minimal Chromium browser, controlled by JavaScript. Then all the electron apps are technically web pages running in a browser that can leverage your Bone APIs.
Who Uses Electron?
Github developed Electron for creating the text editor Atom. They were both open sourced in 2014. Electron is used by many companies like Microsoft, Github, Slack, etc.
Electron has been used to create a number of apps. Following are a few notable apps −
- Slack desktop
- Wordpress desktop app
- Visual Studio Code
- Caret Markdown Editor
- Nylas E-mail App
- GitKraken git client
Electron - Installation
To get started with developing using the Electron, you need to have Node and npm(node package manager) installed. If you practice not already take these, head over to Node setup to install node on your local system. Confirm that node and npm are installed by running the post-obit commands in your terminal.
node --version npm --version
The to a higher place command will generate the post-obit output −
v6.9.1 three.10.8
Whenever we create a project using npm, we demand to provide a package.json file, which has all the details about our project. npm makes it easy for u.s.a. to set this file. Permit us set upwardly our development projection.
-
Burn down up your terminal/cmd, create a new folder named how-do-you-do-globe and open that folder using the cd command.
-
At present to create the package.json file using npm, utilise the following command.
npm init
-
Information technology will ask yous for the following information −

But keep pressing Enter, and enter your name at the "author proper name" field.
Create a new folder and open information technology using the cd command. Now run the following command to install Electron globally.
$ npm install -m electron-prebuilt
In one case information technology executes, you lot tin check if Electron is installed the correct way past running the post-obit command −
$ electron --version
You should get the output −
v1.4.13
Now that we have set upward Electron, permit us motility on to creating our offset app using it.
How Electron Works
Electron takes a primary file defined in your package.json file and executes it. This main file creates awarding windows which contain rendered web pages and interaction with the native GUI (graphical user interface) of your Operating Arrangement.
Every bit you lot showtime an application using Electron, a main procedure is created. This main process is responsible for interacting with the native GUI of the Operating Organization. Information technology creates the GUI of your application.
Only starting the main process does non give the users of your awarding any application window. These are created past the principal procedure in the master file by using the BrowserWindow module. Each browser window then runs its own renderer process. The renderer process takes an HTML file which references the usual CSS files, JavaScript files, images, etc. and renders it in the window.
The main procedure can admission the native GUI through modules available direct in Electron. The desktop application can access all Node modules like the file system module for handling files, request to brand HTTP calls, etc.
Deviation between Main and Renderer processes
The main process creates web pages past creating the BrowserWindow instances. Each BrowserWindow instance runs the web page in its own renderer process. When a BrowserWindow case is destroyed, the corresponding renderer process is also terminated.
The main process manages all spider web pages and their corresponding renderer processes. Each renderer process is isolated and merely cares nearly the web folio running in it.
Electron - Hullo World
Nosotros have created a parcel.json file for our project. Now nosotros will create our beginning desktop app using Electron.
Create a new file called chief.js. Enter the following code in it −
const {app, BrowserWindow} = require('electron') const url = require('url') const path = require('path') let win function createWindow() { win = new BrowserWindow({width: 800, height: 600}) win.loadURL(url.format ({ pathname: path.bring together(__dirname, 'alphabetize.html'), protocol: 'file:', slashes: true })) } app.on('set up', createWindow) Create another file, this fourth dimension an HTML file chosen alphabetize.html. Enter the post-obit code in it.
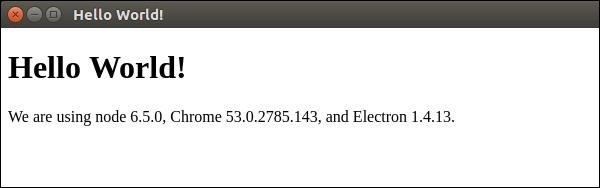
<!DOCTYPE html> <html> <caput> <meta charset = "UTF-viii"> <title>Hello World!</championship> </head> <body> <h1>Hello Globe!</h1> We are using node <script>document.write(process.versions.node)</script>, Chrome <script>document.write(process.versions.chrome)</script>, and Electron <script>document.write(procedure.versions.electron)</script>. </body> </html>
Run this app using the following command −
$ electron ./master.js
A new window will open. It volition look like the following −
How Does This App Work?
We created a main file and an HTML file. The main file uses two modules – app and BrowserWindow. The app module is used to control your application's effect lifecycle while the BrowserWindow module is used to create and control browser windows.
We divers a createWindow function, where we are creating a new BrowserWindow and attaching a URL to this BrowserWindow. This is the HTML file that is rendered and shown to u.s. when we run the app.
Nosotros have used a native Electron object process in our html file. This object is extended from the Node.js process object and includes all of t=its functionalities while calculation many more.
Electron - Building UIs
The User Interface of Electron apps is built using HTML, CSS and JS. So nosotros can leverage all the available tools for forepart-end spider web development here too. You can utilise the tools such as Athwart, Courage, React, Bootstrap, and Foundation, to build the apps.
Yous can apply Bower to manage these front-terminate dependencies. Install bower using −
$ npm install -g bower
Now y'all can become all the available JS and CSS frameworks, libraries, plugins, etc. using bower. For example, to get the latest stable version of bootstrap, enter the following command −
$ bower install bootstrap
This will download bootstrap in bower_components. At present you can reference this library in your HTML. Let us create a simple page using these libraries.
Permit united states of america now install jquery using the npm command −
$ npm install --save jquery
Further, this will exist required in our view.js file. Nosotros already have a main.js setup every bit follows −
const {app, BrowserWindow} = require('electron') const url = require('url') const path = require('path') allow win function createWindow() { win = new BrowserWindow({width: 800, acme: 600}) win.loadURL(url.format ({ pathname: path.bring together(__dirname, 'index.html'), protocol: 'file:', slashes: true })) } app.on('set up', createWindow) Open your index.html file and enter the following code in it −
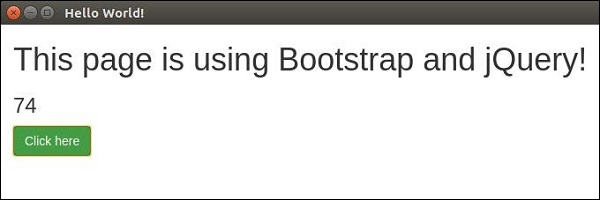
<!DOCTYPE html> <html> <head> <meta charset = "UTF-viii"> <title>Hello World!</title> <link rel = "stylesheet" href = "./bower_components/bootstrap/dist/css/bootstrap.min.css" /> </caput> <torso> <div class = "container"> <h1>This page is using Bootstrap and jQuery!</h1> <h3 id = "click-counter"></h3> <button class = "btn btn-success" id = "countbtn">Click here</push button> <script src = "./view.js" ></script> </div> </body> </html>
Create view.js and enter the click counter logic in it −
permit $ = require('jquery') // jQuery at present loaded and assigned to $ permit count = 0 $('#click-counter').text(count.toString()) $('#countbtn').on('click', () => { count ++ $('#click-counter').text(count) }) Run the app using the post-obit control −
$ electron ./primary.js
The in a higher place control will generate the output as in the following screenshot −
You can build your native app just similar y'all build websites. If you do not want users to be restricted to an exact window size, you can leverage the responsive design and allow users to utilize your app in a flexible manner.
Electron - File Handling
File treatment is a very important part of building a desktop application. Almost all desktop apps interact with files.
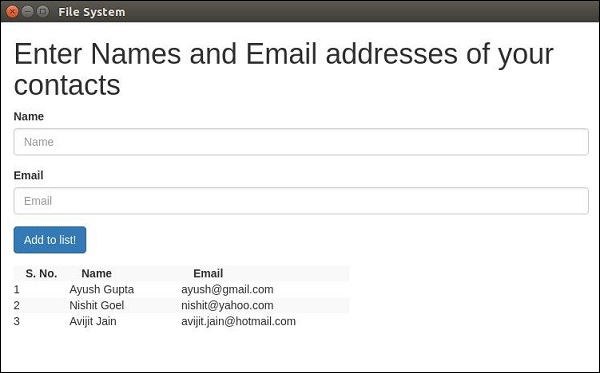
Nosotros will create a grade in our app that will have as input, a Proper noun and an E-mail accost. This course volition be saved to a file and a list will exist created that will show this as output.
Fix upward your main process using the post-obit lawmaking in the master.js file −
const {app, BrowserWindow} = require('electron') const url = require('url') const path = require('path') let win office createWindow() { win = new BrowserWindow({width: 800, height: 600}) win.loadURL(url.format ({ pathname: path.join(__dirname, 'index.html'), protocol: 'file:', slashes: true })) } app.on('ready', createWindow) Now open the alphabetize.html file and enter the post-obit code in it −
<!DOCTYPE html> <html> <head> <meta charset = "UTF-8"> <title>File System</title> <link rel = "stylesheet" href = "./bower_components/bootstrap/dist/css/bootstrap.min.css" /> <fashion blazon = "text/css"> #contact-list { pinnacle: 150px; overflow-y: auto; } </style> </head> <body> <div class = "container"> <h1>Enter Names and Email addresses of your contacts</h1> <div form = "course-group"> <label for = "Name">Proper name</characterization> <input blazon = "text" proper noun = "Name" value = "" id = "Name" placeholder = "Proper noun" class = "class-control" required> </div> <div class = "course-grouping"> <label for = "Email">Email</label> <input type = "email" name = "Email" value = "" id = "Email" placeholder = "Electronic mail" class = "class-control" required> </div> <div class = "form-grouping"> <button class = "btn btn-chief" id = "add-to-list">Add to list!</button> </div> <div id = "contact-list"> <table class = "tabular array-striped" id = "contact-table"> <tr> <th class = "col-xs-2">South. No.</th> <th grade = "col-xs-4">Proper noun</th> <thursday form = "col-xs-6">Email</th> </tr> </table> </div> <script src = "./view.js" ></script> </div> </body> </html> At present we demand to handle the addition event. We will do this in our view.js file.
We will create a function loadAndDisplayContacts() that volition initially load contacts from the file. Later on creating the loadAndDisplayContacts() role, we will create a click handler on our add to list button. This will add the entry to both the file and the tabular array.
In your view.js file, enter the following code −
let $ = require('jquery') let fs = require('fs') let filename = 'contacts' permit sno = 0 $('#add-to-listing').on('click', () => { allow name = $('#Name').val() allow e-mail = $('#Email').val() fs.appendFile('contacts', proper noun + ',' + email + '\n') addEntry(name, email) }) function addEntry(name, email) { if(name && electronic mail) { sno++ let updateString = '<tr><td>'+ sno + '</td><td>'+ proper noun +'</td><td>' + e-mail +'</td></tr>' $('#contact-table').append(updateString) } } office loadAndDisplayContacts() { //Check if file exists if(fs.existsSync(filename)) { let data = fs.readFileSync(filename, 'utf8').separate('\n') information.forEach((contact, index) => { let [ name, electronic mail ] = contact.split up(',') addEntry(name, email) }) } else { console.log("File Doesn\'t Exist. Creating new file.") fs.writeFile(filename, '', (err) => { if(err) console.log(err) }) } } loadAndDisplayContacts() Now run the application, using the following command −
$ electron ./main.js
Once you add some contacts to it, the awarding will look like −
For more fs module API calls, please refer to Node File System tutorial.
Now we can handle files using Electron. We will expect at how to call the save and open dialog boxes(native) for files in the dialogs chapter.
Electron - Native Node Libraries
We used a node module, fs, in the previous affiliate. Nosotros will at present wait at another node modules that we can use with Electron.
Os module
Using the OS module, we tin get a lot of data near the organization our application is running on. Post-obit are a few methods that help while the app is existence created. These methods assistance us customize the apps according to the OS that they are running on.
| Sr.No | Function & Description |
|---|---|
| ane | os.userInfo([options]) The os.userInfo() method returns information near the currently constructive user. This data tin exist used to personalize the application for the user fifty-fifty without explicitly asking for information. |
| ii | os.platform() The os.platform() method returns a string identifying the operating system platform. This can exist used to customize the app according to the user Bone. |
| 3 | os.homedir() The os.homedir() method returns the domicile directory of the current user as a string. Generally, configs of all users reside in the domicile directory of the user. So this can be used for the aforementioned purpose for our app. |
| 4 | os.arch() The os.curvation() method returns a string identifying the operating arrangement CPU architecture. This can exist used when running on exotic architectures to adapt your awarding for that organization. |
| 5 | bone.EOL A string abiding defining the operating system-specific end-ofline marking. This should exist used whenever ending lines in files on the host OS. |
Using the same main.js file and the following HTML file, we tin can print these properties on the screen −
<html> <caput> <championship>Os Module</championship> </head> <body> <script> let os = require('os') certificate.write('User Info: ' + JSON.stringify(os.userInfo()) + '<br>' + 'Platform: ' + os.platform() + '<br>' + 'User home directory: ' + os.homedir() + '<br>' + 'OS Compages: ' + os.arch() + '<br>') </script> </body> </html> Now run the app using the following command −
$ electron ./main.js
The to a higher place command will generate the following output −
User Info: {"uid":thou,"gid":1000,"username":"ayushgp","homedir":"/home/ayushgp", "beat out":"/usr/bin/zsh"} Platform: linux User home directory: /abode/ayushgp OS Compages: x64 Internet Module
The net module is used for network related piece of work in the app. We can create both servers and socket connections using this module. Generally, the employ of wrapper module from npm is recommended over the use of the net module for networking related tasks.
The following tables lists downwardly the most useful methods from the module −
| Sr.No | Function & Clarification |
|---|---|
| 1 | net.createServer([options][, connectionListener]) Creates a new TCP server. The connectionListener argument is automatically set as a listener for the 'connexion' effect. |
| 2 | net.createConnection(options[, connectionListener]) A factory method, which returns a new 'net.Socket' and connects to the supplied address and port. |
| 3 | net.Server.listen(port[, host][, backlog][, callback]) Begin accepting connections on the specified port and host. If the host is omitted, the server will accept connections directed to any IPv4 address. |
| 4 | net.Server.shut([callback]) Finally closed when all connections are concluded and the server emits a 'shut' event. |
| 5 | cyberspace.Socket.connect(port[, host][, connectListener]) Opens the connection for a given socket. If port and host are given, then the socket volition be opened every bit a TCP socket. |
The internet module comes with a few other methods too. To go a more than comprehensive listing, see this.
Now, let us create an electron app that uses the net module to create connections to the server. We will need to create a new file, server.js −
var internet = crave('net'); var server = net.createServer(function(connection) { console.log('Client Continued'); connection.on('terminate', function() { console.log('customer disconnected'); }); connection.write('Hello World!\r\n'); connectedness.pipage(connection); }); server.listen(8080, function() { console.log('Server running on http://localhost:8080'); }); Using the aforementioned main.js file, replace the HTML file with the following −
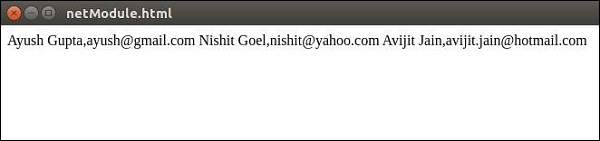
<html> <head> <title>net Module</title> </caput> <body> <script> var internet = crave('net'); var client = net.connect({port: 8080}, function() { console.log('Connectedness established!'); }); client.on('data', part(data) { document.write(data.toString()); customer.end(); }); client.on('end', office() { console.log('Disconnected :('); }); </script> </body> </html> Run the server using the following command −
$ node server.js
Run the awarding using the following command −
$ electron ./main.js
The above control will generate the following output −
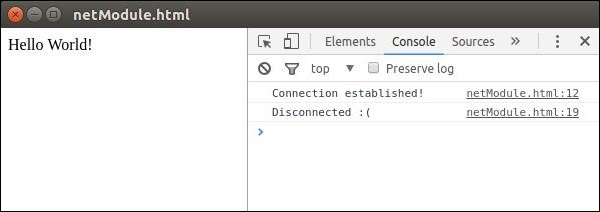
Observe that we connect to the server automatically and automatically get disconnected too.
We also take a few other node modules that we can be used directly on the front-end using Electron. The usage of these modules depends on the scenario y'all apply them in.
Electron - Inter Process Communication
Electron provides us with 2 IPC (Inter Process Communication) modules called ipcMain and ipcRenderer.
The ipcMain module is used to communicate asynchronously from the main process to renderer processes. When used in the primary procedure, the module handles asynchronous and synchronous letters sent from a renderer process (web folio). The messages sent from a renderer will exist emitted to this module.
The ipcRenderer module is used to communicate asynchronously from a renderer process to the main procedure. Information technology provides a few methods so y'all can transport synchronous and asynchronous letters from the renderer process (web page) to the main procedure. You tin can as well receive replies from the main process.
We will create a main procedure and a renderer procedure that will send each other letters using the to a higher place modules.
Create a new file called main_process.js with the following contents −
const {app, BrowserWindow} = require('electron') const url = require('url') const path = crave('path') const {ipcMain} = crave('electron') let win function createWindow() { win = new BrowserWindow({width: 800, height: 600}) win.loadURL(url.format ({ pathname: path.join(__dirname, 'index.html'), protocol: 'file:', slashes: true })) } // Event handler for asynchronous incoming messages ipcMain.on('asynchronous-bulletin', (event, arg) => { console.log(arg) // Event emitter for sending asynchronous messages upshot.sender.send('asynchronous-answer', 'async pong') }) // Upshot handler for synchronous incoming letters ipcMain.on('synchronous-message', (consequence, arg) => { console.log(arg) // Synchronous outcome emmision event.returnValue = 'sync pong' }) app.on('prepare', createWindow) Now create a new index.html file and add the following code in information technology.
<!DOCTYPE html> <html> <head> <meta charset = "UTF-8"> <title>Hi World!</title> </head> <body> <script> const {ipcRenderer} = require('electron') // Synchronous message emmiter and handler console.log(ipcRenderer.sendSync('synchronous-message', 'sync ping')) // Async bulletin handler ipcRenderer.on('asynchronous-answer', (consequence, arg) => { console.log(arg) }) // Async message sender ipcRenderer.ship('asynchronous-message', 'async ping') </script> </trunk> </html> Run the app using the following control −
$ electron ./main_process.js
The to a higher place command will generate the following output −
// On your app console Sync Pong Async Pong // On your terminal where you ran the app Sync Ping Async Ping
Information technology is recommended not to perform computation of heavy/ blocking tasks on the renderer process. Always use IPC to consul these tasks to the main process. This helps in maintaining the pace of your application.
Electron - System Dialogs
It is very of import for whatsoever app to exist a user-friendly one. Every bit a result you should non create dialog boxes using alert() calls. Electron provides a pretty good interface to accomplish the task of creating dialog boxes. Let u.s.a. have a look at it.
Electron provides a dialog module that nosotros can use for displaying native arrangement dialogs for opening and saving files, alerting, etc.
Let us directly jump into an example and create an app to brandish simple textfiles.
Create a new main.js file and enter the post-obit code in it −
const {app, BrowserWindow} = require('electron') const url = require('url') const path = require('path') const {ipcMain} = require('electron') let win role createWindow() { win = new BrowserWindow({width: 800, meridian: 600}) win.loadURL(url.format ({ pathname: path.join(__dirname, 'index.html'), protocol: 'file:', slashes: true })) } ipcMain.on('openFile', (event, path) => { const {dialog} = crave('electron') const fs = require('fs') dialog.showOpenDialog(function (fileNames) { // fileNames is an array that contains all the selected if(fileNames === undefined) { console.log("No file selected"); } else { readFile(fileNames[0]); } }); office readFile(filepath) { fs.readFile(filepath, 'utf-8', (err, data) => { if(err){ warning("An error ocurred reading the file :" + err.message) render } // handle the file content event.sender.transport('fileData', data) }) } }) app.on('set up', createWindow) This code will pop open up the open dialog box whenever our master process recieves a 'openFile' message from a renderer process. This message will redirect the file content back to the renderer process. At present, nosotros volition have to print the content.
At present, create a new index.html file with the following content −
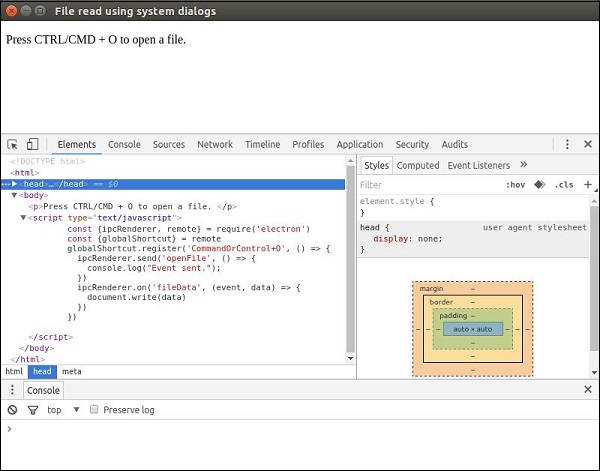
<!DOCTYPE html> <html> <head> <meta charset = "UTF-8"> <championship>File read using system dialogs</title> </head> <body> <script blazon = "text/javascript"> const {ipcRenderer} = crave('electron') ipcRenderer.transport('openFile', () => { console.log("Consequence sent."); }) ipcRenderer.on('fileData', (event, information) => { document.write(data) }) </script> </body> </html> Now whenever we run our app, a native open dialog box will pop up as shown in the following screenshot −
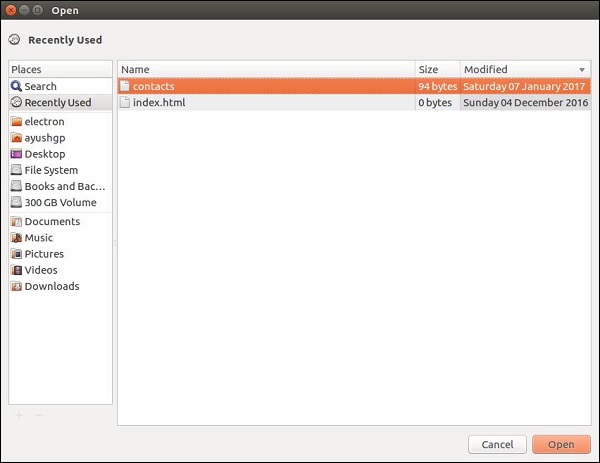
One time we select a file to brandish, its contents will be displayed on the app window −
This was just one of the four dialogs that Electron provides. They all have similar usage though. Once you acquire how to do it using showOpenDialog, then you can use whatever of the other dialogs.
The dialogs having the aforementioned functionality are −
- showSaveDialog([browserWindow, ]options[, callback])
- showMessageDialog([browserWindow, ]options[, callback])
- showErrorDialog(title, content)
Electron - Menus
The desktop apps come with 2 types of menus – the application menu(on the top bar) and a context menu(right-click bill of fare). We will learn how to create both of these in this chapter.
Nosotros will exist using ii modules – the Menu and the MenuItem modules. Note that the Carte and the MenuItem modules are simply available in the master process. For using these modules in the renderer process, you need the remote module. We volition see this when we create a context carte.
Now, let us create a new main.js file for the master process −
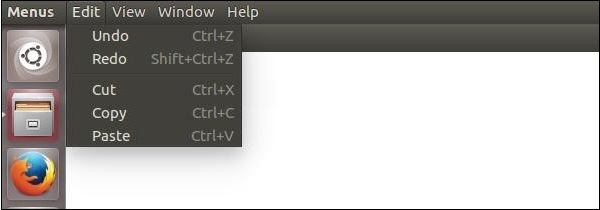
const {app, BrowserWindow, Carte du jour, MenuItem} = crave('electron') const url = require('url') const path = require('path') allow win office createWindow() { win = new BrowserWindow({width: 800, height: 600}) win.loadURL(url.format ({ pathname: path.bring together(__dirname, 'index.html'), protocol: 'file:', slashes: true })) } const template = [ { characterization: 'Edit', submenu: [ { role: 'disengage' }, { role: 'redo' }, { blazon: 'separator' }, { role: 'cut' }, { role: 'copy' }, { role: 'paste' } ] }, { characterization: 'View', submenu: [ { role: 'reload' }, { function: 'toggledevtools' }, { type: 'separator' }, { part: 'resetzoom' }, { role: 'zoomin' }, { role: 'zoomout' }, { blazon: 'separator' }, { role: 'togglefullscreen' } ] }, { role: 'window', submenu: [ { office: 'minimize' }, { part: 'close' } ] }, { role: 'aid', submenu: [ { label: 'Larn More' } ] } ] const bill of fare = Menu.buildFromTemplate(template) Bill of fare.setApplicationMenu(bill of fare) app.on('set', createWindow) We are building a carte du jour from a template here. This means that we provide the menu as a JSON to the function and it will take care of the rest. Now nosotros have to set this menu as the Application carte du jour.
Now create an empty HTML file called index.html and run this application using −
$ electron ./main.js
On the normal position of application menus, you volition see a card based on the higher up template.
We created this bill of fare from the main process. Allow us now create a context bill of fare for our app. We will practise this in our HTML file −
<!DOCTYPE html> <html> <head> <meta charset = "UTF-eight"> <championship>Menus</title> </head> <body> <script type = "text/javascript"> const {remote} = require('electron') const {Carte, MenuItem} = remote const card = new Card() // Build menu one item at a time, unlike menu.append(new MenuItem ({ label: 'MenuItem1', click() { console.log('detail 1 clicked') } })) menu.append(new MenuItem({type: 'separator'})) menu.append(new MenuItem({label: 'MenuItem2', type: 'checkbox', checked: truthful})) bill of fare.append(new MenuItem ({ label: 'MenuItem3', click() { console.log('detail 3 clicked') } })) // Prevent default activity of right click in chromium. Replace with our menu. window.addEventListener('contextmenu', (e) => { e.preventDefault() menu.popup(remote.getCurrentWindow()) }, false) </script> </body> </html> We imported the Menu and MenuItem modules using the remote module; and so, nosotros created a carte and appended our menuitems to it one by one. Further, we prevented the default activeness of right-click in chromium and replaced information technology with our menu.
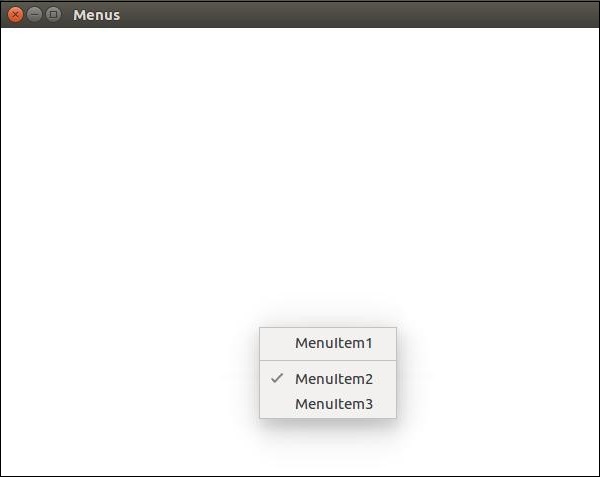
The creation of menus in Electron is a very simple job. Now you can attach your event handlers to these items and handle the events according to your needs.
Electron - Arrangement Tray
System tray is a menu outside of your application window. On MacOS and Ubuntu, information technology is located on the height right corner of your screen. On Windows it is on the bottom right corner. Nosotros can create menus for our application in system trays using Electron.
Create a new master.js file and add together the post-obit code to it. Take a png file ready to utilize for the system tray icon.
const {app, BrowserWindow} = require('electron') const url = require('url') const path = require('path') let win function createWindow() { win = new BrowserWindow({width: 800, meridian: 600}) win.loadURL(url.format ({ pathname: path.join(__dirname, 'index.html'), protocol: 'file:', slashes: true })) } app.on('ready', createWindow) Afterward having ready a basic browser window, nosotros volition create a new index.html file with the post-obit content −
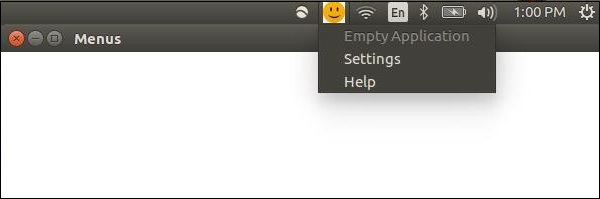
<!DOCTYPE html> <html> <head> <meta charset = "UTF-eight"> <title>Menus</title> </caput> <body> <script type = "text/javascript"> const {remote} = require('electron') const {Tray, Menu} = remote const path = require('path') permit trayIcon = new Tray(path.bring together('','/home/ayushgp/Desktop/images.png')) const trayMenuTemplate = [ { label: 'Empty Application', enabled: false }, { label: 'Settings', click: function () { console.log("Clicked on settings") } }, { characterization: 'Aid', click: office () { panel.log("Clicked on Help") } } ] let trayMenu = Menu.buildFromTemplate(trayMenuTemplate) trayIcon.setContextMenu(trayMenu) </script> </trunk> </html> We created the tray using the Tray submodule. Nosotros then created a bill of fare using a template and further attached the menu to our tray object.
Run the application using the post-obit command −
$ electron ./main.js
When you run the in a higher place command, check your organisation tray for the icon you used. I used a smiley face for my awarding. The above control volition generate the following output −
Electron - Notifications
Electron provides native notifications API only for MacOS. And so we are not going to use that, instead we'll exist using a npm module chosen node-notifier. It allows u.s. to notify users on Windows, MacOS and Linux.
Install the node-notifier module in your app folder using the post-obit command in that binder −
$ npm install --save node-notifier
Let us now create an app that has a push button which will generate a notification every time we click on this push button.
Create a new main.js file and enter the following code in it −
const {app, BrowserWindow} = require('electron') const url = require('url') const path = require('path') allow win function createWindow() { win = new BrowserWindow({width: 800, pinnacle: 600}) win.loadURL(url.format ({ pathname: path.bring together(__dirname, 'index.html'), protocol: 'file:', slashes: true })) } app.on('set up', createWindow) Permit us at present create our webpage and script that volition trigger the notification. Create a new alphabetize.html file with the following lawmaking −
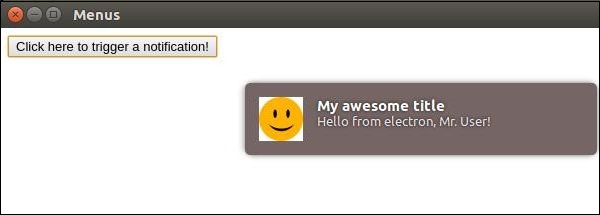
<!DOCTYPE html> <html> <head> <meta charset = "UTF-8"> <title>Menus</title> </caput> <trunk> <button type = "button" id = "notify" name = "button"> Click hither to trigger a notification!</button> <script type = "text/javascript"> const notifier = crave('node-notifier') const path = require('path'); certificate.getElementById('notify').onclick = (event) => { notifier.notify ({ championship: 'My crawly championship', message: 'Hello from electron, Mr. User!', icon: path.bring together('','/home/ayushgp/Desktop/images.png'), // Accented path (doesn't work on balloons) sound: true, // Simply Notification Center or Windows Toasters wait: truthful // Wait with callback, until user action is taken against notification }, role (err, response) { // Response is response from notification }); notifier.on('click', function (notifierObject, options) { console.log("You clicked on the notification") }); notifier.on('timeout', part (notifierObject, options) { console.log("Notification timed out!") }); } </script> </trunk> </html> The notify method allows us to pass it an objectwith information like the title, message, thumbnail, etc. which help us customize the notification. We can besides set some effect listeners on the notification.
Now, run the app using the following command −
$ electron ./main.js
When you click on the push that we created, you will see a native notification from your operating system as shown in the post-obit screenshot −
Nosotros have also handled the events wherein, the user clicks the notification or the notification times out. These methods help u.s.a. brand the app more interactive if its running in the groundwork.
Electron - Webview
The webview tag is used to embed the 'guest' content like spider web pages in your Electron app. This content is contained within the webview container. An embedded page within your app controls how this content will exist displayed.
The webview runs in a split process than your app. To ensure security from malicious content, the webview doesn't have same permissions as your web page. This keeps your app safe from the embedded content. All interactions between your app and the embedded page will be asynchronous.
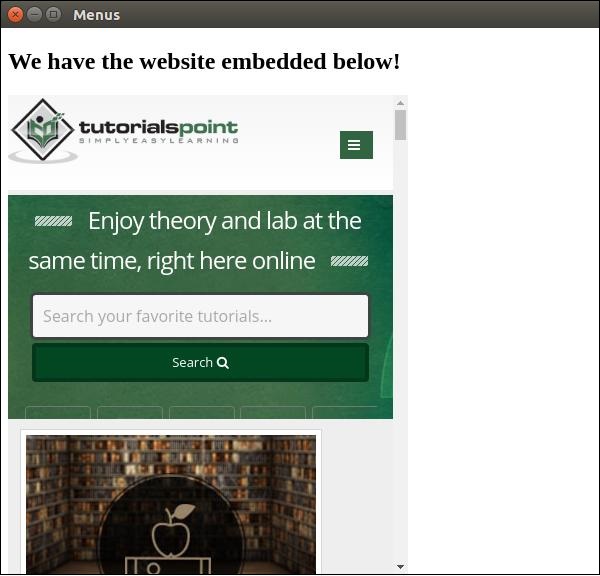
Let us consider an instance to sympathise the embedding of an external webpage in our Electron app. We will embed the tutorialspoint website in our app on the right side. Create a new primary.js file with the following content −
const {app, BrowserWindow} = crave('electron') const url = require('url') const path = require('path') let win function createWindow() { win = new BrowserWindow({width: 800, height: 600}) win.loadURL(url.format ({ pathname: path.bring together(__dirname, 'index.html'), protocol: 'file:', slashes: true })) } app.on('fix', createWindow) Now that nosotros take set our main process, let united states create the HTML file that will embed the tutorialspoint website. Create a file chosen index.html with the following content −
<!DOCTYPE html> <html> <head> <meta charset = "UTF-viii"> <title>Menus</title> </head> <body> <div> <div> <h2>We have the website embedded below!</h2> </div> <webview id = "foo" src = "https://www.tutorialspoint.com/" mode = "width:400px; height:480px;"> <div class = "indicator"></div> </webview> </div> <script type = "text/javascript"> // Event handlers for loading events. // Use these to handle loading screens, transitions, etc onload = () => { const webview = certificate.getElementById('foo') const indicator = document.querySelector('.indicator') const loadstart = () => { indicator.innerText = 'loading...' } const loadstop = () => { indicator.innerText = '' } webview.addEventListener('did-first-loading', loadstart) webview.addEventListener('did-stop-loading', loadstop) } </script> </body> </html> Run the app using the following control −
$ electron ./main.js
The above command volition generate the following output −
The webview tag tin can be used for other resources as well. The webview element has a list of events that it emits listed on the official docs. You can apply these events to amend the functionality depending on the things that have place in the webview.
Whenever yous are embedding scripts or other resource from the Net, it is advisable to use webview. This is recommended equally information technology comes with nifty security benefits and does not hinder normal behaviour.
Electron - Sound and Video Capturing
Sound and video capturing are important characteristics if you are building apps for screen sharing, voice memos, etc. They are also useful if you require an application to capture the profile picture.
We will exist using the getUserMedia HTML5 API for capturing sound and video streams with Electron. Let us first fix up our master process in the main.js file every bit follows −
const {app, BrowserWindow} = crave('electron') const url = crave('url') const path = require('path') allow win // Ready the path where recordings will be saved app.setPath("userData", __dirname + "/saved_recordings") office createWindow() { win = new BrowserWindow({width: 800, height: 600}) win.loadURL(url.format({ pathname: path.join(__dirname, 'index.html'), protocol: 'file:', slashes: true })) } app.on('ready', createWindow) Now that nosotros have set upward our primary process, let united states of america create the HTML file that will be capturing this content. Create a file called alphabetize.html with the following content −
<!DOCTYPE html> <html> <head> <meta charset = "UTF-8"> <championship>Audio and Video</title> </caput> <body> <video autoplay></video> <script type = "text/javascript"> office errorCallback(e) { console.log('Fault', e) } navigator.getUserMedia({video: true, audio: true}, (localMediaStream) => { var video = document.querySelector('video') video.src = window.URL.createObjectURL(localMediaStream) video.onloadedmetadata = (east) => { // Ready to get. Do some stuff. }; }, errorCallback) </script> </body> </html> The to a higher place plan will generate the following output −
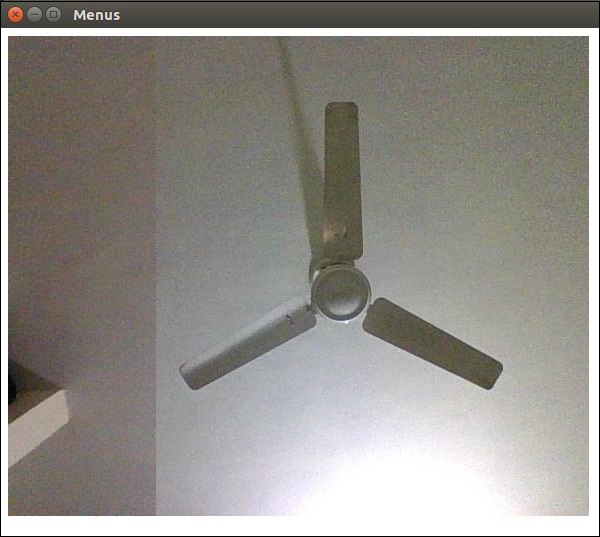
Y'all at present have the stream from both your webcam and your microphone. Yous can send this stream over the network or save this in a format you like.
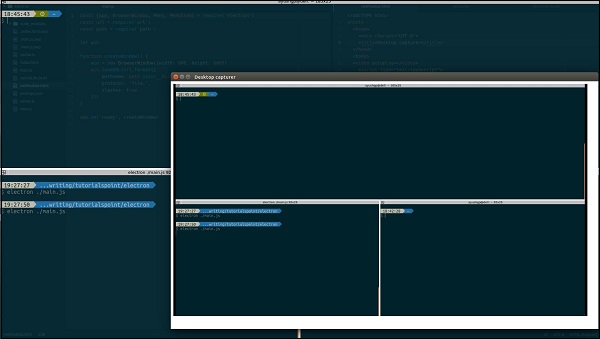
Have a expect at the MDN Documentation for capturing images to get the images from your webcam and shop them. This was washed using the HTML5 getUserMedia API. You can also capture the user desktop using the desktopCapturer module that comes with Electron. Let us now see an case of how to get the screen stream.
Utilize the same main.js file as above and edit the index.html file to take the post-obit content −
desktopCapturer.getSources({types: ['window', 'screen']}, (error, sources) => { if (error) throw mistake for (let i = 0; i < sources.length; ++i) { if (sources[i].name === 'Your Window Proper name hither!') { navigator.webkitGetUserMedia({ audio: false, video: { mandatory: { chromeMediaSource: 'desktop', chromeMediaSourceId: sources[i].id, minWidth: 1280, maxWidth: 1280, minHeight: 720, maxHeight: 720 } } }, handleStream, handleError) return } } }) function handleStream (stream) { document.querySelector('video').src = URL.createObjectURL(stream) } function handleError (due east) { console.log(e) } We accept used the desktopCapturer module to get the data virtually each open window. Now you tin capture the events of a specific application or of the unabridged screen depending on the name you laissez passer to the above if statement. This will stream just that which is happening on that screen to your app.
You can refer to this StackOverflow question to understand the usage in detail.
Electron - Defining Shortcuts
Nosotros typically have memorized sure shortcuts for all the apps that we use on our PC daily. To make your applications feel intuitive and hands accessible to the user, you must allow the user to use shortcuts.
We will use the globalShortcut module to define shortcuts in our app. Annotation that Accelerators are Strings that can incorporate multiple modifiers and cardinal codes, combined by the + graphic symbol. These accelerators are used to define keyboard shortcuts throughout our awarding.
Let the states consider an example and create a shortcut. For this, we will follow the dialog boxes example where we used the open up dialog box for opening files. We will register a CommandOrControl+O shortcut to bring up the dialog box.
Our main.js code volition remain the same as earlier. And so create a new main.js file and enter the following lawmaking in it −
const {app, BrowserWindow} = require('electron') const url = require('url') const path = require('path') const {ipcMain} = require('electron') let win role createWindow() { win = new BrowserWindow({width: 800, meridian: 600}) win.loadURL(url.format ({ pathname: path.join(__dirname, 'alphabetize.html'), protocol: 'file:', slashes: true })) } ipcMain.on('openFile', (effect, path) => { const {dialog} = require('electron') const fs = require('fs') dialog.showOpenDialog(function (fileNames) { // fileNames is an array that contains all the selected if(fileNames === undefined) panel.log("No file selected") else readFile(fileNames[0]) }) office readFile(filepath){ fs.readFile(filepath, 'utf-8', (err, data) => { if(err){ alert("An mistake ocurred reading the file :" + err.message) return } // handle the file content effect.sender.send('fileData', information) }) } }) app.on('gear up', createWindow) This code will pop open the open up dialog box whenever our primary process receives a 'openFile' bulletin from a renderer procedure. Before this dialog box popped up whenever the app was run. Let usa now limit information technology to open simply when we press CommandOrControl+O.
Now create a new index.html file with the following content −
<!DOCTYPE html> <html> <head> <meta charset = "UTF-eight"> <title>File read using system dialogs</title> </head> <torso> <p>Press CTRL/CMD + O to open a file. </p> <script type = "text/javascript"> const {ipcRenderer, remote} = require('electron') const {globalShortcut} = remote globalShortcut.register('CommandOrControl+O', () => { ipcRenderer.send('openFile', () => { console.log("Event sent."); }) ipcRenderer.on('fileData', (event, information) => { certificate.write(data) }) }) </script> </body> </html> Nosotros registered a new shortcut and passed a callback that will be executed whenever we press this shortcut. We can deregister shortcuts as and when we practise non require them.
Now once the app is opened, we will get the message to open the file using the shortcut we simply defined.
These shortcuts tin can be made customizable by allowing the user to cull his ain shortcuts for defined actions.
Electron - Environs Variables
Environment Variables control awarding configuration and behavior without changing code. Certain Electron behaviors are controlled by environment variables considering they are initialized earlier than the command line flags and the app'south code.
There are two kinds of surroundings variables encoded in electron – Production variables and Development variables.
Production Variables
The following environment variables are intended for employ at runtime in packaged Electron applications.
| Sr.No | Variable & Description |
|---|---|
| one | GOOGLE_API_KEY Electron includes a hardcoded API key for making requests to Google's geocoding webservice. Considering this API central is included in every version of Electron, information technology often exceeds its usage quota. To piece of work around this, y'all can supply your ain Google API key in the environment. Place the following code in your main procedure file, before opening any browser windows that volition brand geocoding requests − process.env.GOOGLE_API_KEY = 'YOUR_KEY_HERE' |
| 2 | ELECTRON_RUN_AS_NODE Starts the procedure as a normal Node.js process. |
| 3 | ELECTRON_FORCE_WINDOW_MENU_BAR (Linux Only) Do not use the global bill of fare bar on Linux. |
Development Variables
The following surroundings variables are intended primarily for evolution and debugging purposes.
| Sr.No | Variable & Description |
|---|---|
| 1 | ELECTRON_ENABLE_LOGGING Prints Chrome's internal logging to the console. |
| 2 | ELECTRON_ENABLE_STACK_DUMPING Prints the stack trace to the console when Electron crashes. |
| 3 | ELECTRON_DEFAULT_ERROR_MODE Shows the Windows's crash dialog when Electron crashes. |
To set any of these environment variables every bit true, set it in your panel. For example, if you desire to enable logging, and then use the following commands −
For Windows
> gear up ELECTRON_ENABLE_LOGGING=true
For Linux
$ export ELECTRON_ENABLE_LOGGING=true
Note that you lot will need to ready these surround variables every time you restart your computer. If you desire to avert doing then, add together these lines to your .bashrc files.
Electron - Debugging
We have two processes that run our application – the main process and the renderer process.
Since the renderer process is the one beingness executed in our browser window, we can use the Chrome Devtools to debug it. To open DevTools, use the shortcut "Ctrl+Shift+I" or the <F12> key. Y'all can bank check out how to utilize devtools here.
When you open the DevTools, your app volition wait like as shown in the following screenshot −
Debugging the Main Process
The DevTools in an Electron browser window can merely debug JavaScript that is executed in that window (i.due east., the web pages). To debug JavaScript that is executed in the chief process you will need to use an external debugger and launch Electron with the --debug or the --debug-brk switch.
Electron will listen for the V8 debugger protocol messages on the specified port; an external debugger volition need to connect on this port. The default port is 5858.
Run your app using the following −
$ electron --debug = 5858 ./primary.js
Now you volition need a debugger that supports the V8 debugger protocol. You lot can use VSCode or node-inspector for this purpose. For example, let u.s.a. follow these steps and set up VSCode for this purpose. Follow these steps to set it upwards −
Download and install VSCode. Open up your Electron project in VSCode.
Add a file .vscode/launch.json with the post-obit configuration −
{ "version": "one.0.0", "configurations": [ { "proper name": "Debug Main Process", "type": "node", "request": "launch", "cwd": "${workspaceRoot}", "runtimeExecutable": "${workspaceRoot}/node_modules/.bin/electron", "plan": "${workspaceRoot}/main.js" } ] } Note − For Windows, use "${workspaceRoot}/node_modules/.bin/electron.cmd" for runtimeExecutable.
Set some breakpoints in main.js, and starting time debugging in the Debug View. When you hit the breakpoints, the screen will look something similar this −
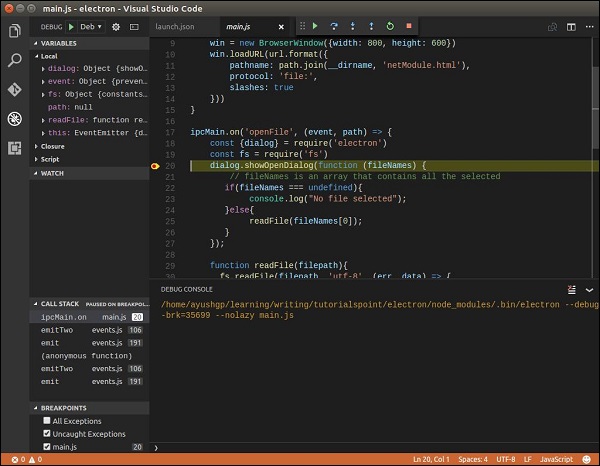
The VSCode debugger is very powerful and will aid you rectify errors quickly. You also have other options like node-inspector for debugging electron apps.
Electron - Packaging Apps
Packaging and distributing apps is an integral office of the development process of a desktop application. Since Electron is a cross-platform desktop awarding evolution framework, packaging and distribution of apps for all the platforms should also exist a seamless experience.
The electron community has created a projection, electron-packager that takes care of the same for us. It allows united states to parcel and distribute our Electron app with OS-specific bundles (.app, .exe etc) via JS or CLI.
Supported Platforms
Electron Packager runs on the following host platforms −
- Windows (32/64 bit)
- OS X
- Linux (x86/x86_64)
It generates executables/bundles for the post-obit target platforms −
- Windows (too known as win32, for both 32/64 bit)
- OS X (also known as darwin) / Mac App Store (also known equally mas)
- Linux (for x86, x86_64, and armv7l architectures)
Installation
Install the electron packager using −
# for use in npm scripts $ npm install electron-packager --save-dev # for utilize from cli $ npm install electron-packager -g
Packaging Apps
In this section, we will encounter how to run the packager from the command line. The basic class of the control is −
electron-packager <sourcedir> <appname> --platform=<platform> --arch=<arch> [optional flags...]
This will −
-
Observe or download the right release of Electron.
-
Apply that version of Electron to create a app in <output-folder>/<appname>-<platform>-<arch>.
--platform and --arch tin be omitted, in ii cases. If you specify --all instead, bundles for all valid combinations of target platforms/architectures volition be created. Otherwise, a single bundle for the host platform/compages will exist created.
Electron - Resources
We accept used the following resources to learn more than nearly Electron. We accept referred to these while creating this tutorial.
The most of import resources is the Electron documentation. The Documentation has extensive coverage of nearly all features and quirks of the framework. They are lonely enough to make your fashion through building an app.
There are as well some very good Electron examples presented in the electron-sample-apps respository.
Video Resources
Desktop apps with web languages
Rapid cross platform desktop app development using JavaScript and Electron
Weblog Posts
Building a desktop awarding with Electron
Build a Music Thespian with React & Electron
Creating Your Start Desktop App With HTML, JS and Electron
Create Cross-Platform Desktop Node Apps with Electron
Useful Video Courses

Video

Video

Video

Video

Video

Video
Source: https://www.tutorialspoint.com/electron/electron_quick_guide.htm
0 Response to "Read Values From Input Fields Javascript Ipcrenderer"
إرسال تعليق